This article was researched and reviewed by Leo, our indoor plant specialist.
# Technical Protocol for Plant Relocation: Minimizing Physiological Stress During Indoor Rearrangement Relocating indoor plants involves a significant shift in the environmental variables affecting the specimen. While a move may appear minor, plants optimize their cellular structures and metabolic processes based on the specific light coordinates of their current location. A sudden change in these coordinates can result in physiological stress.Guide Overview
- The Science of Photo-Acclimation and Stress Response
- The Chloroplast Reorganization Process
- Light Compensation Point vs. Light Saturation Point
- Limitations of the Term ‘Bright Indirect Light’
- Physiological Effects of Sudden Photo-Inhibition
- The Inverse Square Law: Light Intensity and Distance
- Calculating Light Drop-Off with Distance
- Foot-candles vs. LUX: Quantifying the New Environment
- Window Orientation and Seasonal Light Curves
- Corner Placements and the ‘Shadow Zone’ Effect
- The 14-Day Transition: A Systematic Relocation Protocol
- Stage 1: Intermediate Placement (Days 1-4)
- Utilizing Shade Cloths for High-Intensity Transitions (Days 5-10)
- Adjusting Photoperiods on Artificial Lighting
- Identifying Early Indicators of Environmental Stress
- Relocating Large Trellised and Vining Specimens
- Propagation as a Risk Mitigation Strategy
- Managing Apical Dominance Following Structural Shifts
- Managing Aerial Roots During Relocation
- Leaf Orientation and Phototropic Alignment
- Microclimate Management: Humidity and Airflow
- Comparative Analysis: Kitchen vs. Hallway Environments
- Vapor Pressure Deficit (VPD) and Transpiration Rates
- Thermal Stressors: Drafts and Radiators
- Plant Grouping for Micro-Humidity Maintenance
- Post-Relocation Triage: Identifying Scorch, Chlorosis, and Pests
- Distinguishing Photo-Bleaching from Nitrogen Deficiency
- Correlation Between Relocation Stress and Pest Outbreaks
- Protocol for Managing Post-Relocation Leaf Abscission
- Criteria for Reverting to Original Environmental Conditions
The Science of Photo-Acclimation and Stress Response
Relocating a plant requires a recalibration of its metabolic processes. Plants are sessile organisms that adapt to specific micro-niches. Moving them across an indoor space subjects them to significantly different environmental parameters.The Chloroplast Reorganization Process
At the cellular level, plants undergo *phototaxis*, or chloroplast movement. In low-light environments, chloroplasts distribute themselves across the cell surface to maximize photon capture. If a plant is moved to a high-light environment, these chloroplasts may experience photo-inhibition. Excessive light energy can overwhelm photosystems, leading to the production of reactive oxygen species that damage cellular membranes. To mitigate this, chloroplasts relocate to the side walls of the cells, stacking to provide mutual shading. This process requires time and metabolic energy. If the transition occurs too rapidly, the plant cannot reposition its chloroplasts effectively, leading to tissue bleaching. This is observed as white, necrotic patches on the foliage.Light Compensation Point vs. Light Saturation Point
Each species has a Light Compensation Point (LCP), where the energy produced via photosynthesis equals the energy consumed through respiration. If a plant is placed in an environment below its LCP, it will deplete its starch reserves, leading to eventual collapse. The Light Saturation Point (LSP) is the threshold beyond which additional light does not increase photosynthetic rates but instead contributes to thermal stress. Indoor environments with reflective surfaces can create a visual illusion of high light levels while the actual Foot-candle (FC) count remains below the LCP.Limitations of the Term “Bright Indirect Light”
The term “bright indirect light” lacks technical precision. For a *Philodendron*, this may correspond to 200 FC, whereas for a *Ficus lyrata*, it may require 800 FC. Accurate relocation requires the use of a light meter rather than visual estimation, as human pupils adjust to low light levels, masking the actual intensity available to the plant.Physiological Effects of Sudden Photo-Inhibition
During photo-inhibition, plants may reduce CO2 intake to prevent damage, which subsequently slows the transpiration stream through the xylem. This reduction in water and nutrient transport can cause a plant in a bright location to exhibit symptoms of dehydration, such as drooping, despite adequate soil moisture.
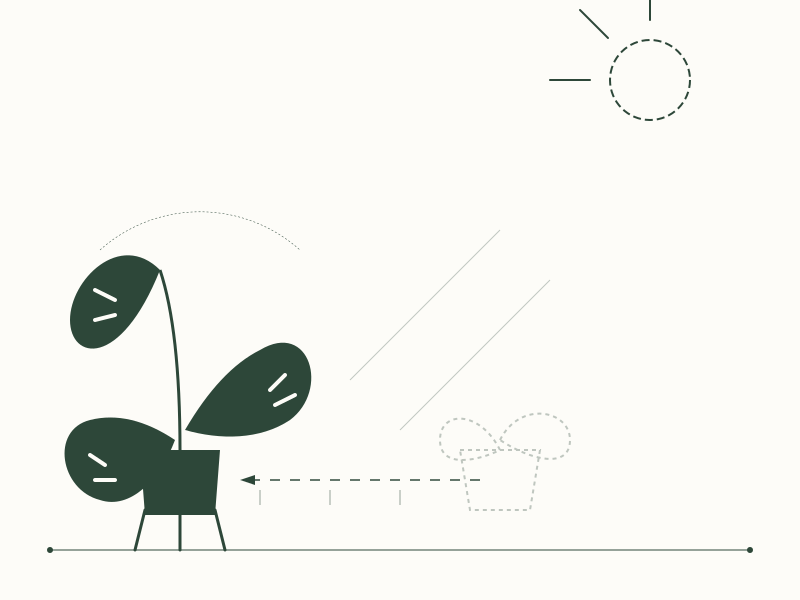
The Inverse Square Law: Light Intensity and Distance
Relocating a plant a short distance from a window results in a significant change in light intensity due to the Inverse Square Law. This law dictates that light intensity is inversely proportional to the square of the distance from the source.Calculating Light Drop-Off with Distance
Increasing the distance from a light source from 2 feet to 4 feet reduces the light intensity to one-quarter of the original value. At 8 feet, the intensity is 1/16th of the original. In a typical indoor setting, light levels can drop from 4,000 FC at the window glass to 400 FC at a distance of five feet. Mapping these light curves is essential for planning a new layout.Foot-candles vs. LUX: Quantifying the New Environment
Light intensity should be measured using Foot-candles or LUX. Measurements should be taken at the current location and the target location at multiple intervals throughout the day (morning, noon, and afternoon). If the variance between locations exceeds 30%, a gradual transition protocol is required.Window Orientation and Seasonal Light Curves
In the Northern Hemisphere, south-facing windows provide the highest intensity but also the highest risk of light shock. Moving a plant from a northern to a southern exposure during peak summer can lead to rapid tissue damage. Relocation plans must account for the sun’s seasonal path. A location that is shaded in winter may experience high heat and light intensity in summer.Corner Placements and the “Shadow Zone” Effect
Placing large plants in corners often results in them being in a “Shadow Zone.” Corners typically receive light from a single angle, leading to asymmetrical growth and phototropism, where the plant leans toward the light source and loses lower foliage.The 14-Day Transition: A Systematic Relocation Protocol
To minimize environmental shock, plants should be acclimated to new indoor conditions over a two-week period.Stage 1: Intermediate Placement (Days 1-4)
Position the plant at a midpoint between the original and the target location. This allows the stomata and chloroplasts to begin adjusting to the new light levels without immediate overexposure.Utilizing Shade Cloths for High-Intensity Transitions (Days 5-10)
If the target location has significantly higher light intensity, use a physical buffer such as a sheer curtain or wax paper to diffuse the light. This reduces infrared heat while maintaining Photosynthetically Active Radiation (PAR). The buffer can be gradually removed over several days.Adjusting Photoperiods on Artificial Lighting
When moving plants under grow lights, do not immediately implement a full 12-hour photoperiod. Start with 6 hours and increase the duration by one hour every two days. This prevents light-induced damage to the upper foliage.Identifying Early Indicators of Environmental Stress
Monitor new growth for signs of stress. Downward leaf curling or chlorosis (yellowing) in new leaves indicates that the transition is occurring too rapidly. If these symptoms appear, increase the distance from the light source immediately to prevent vascular damage.